Showing posts with label Forms. Show all posts

Saturday, June 11, 2016

My wall is bigger than Trump's wall...Finale

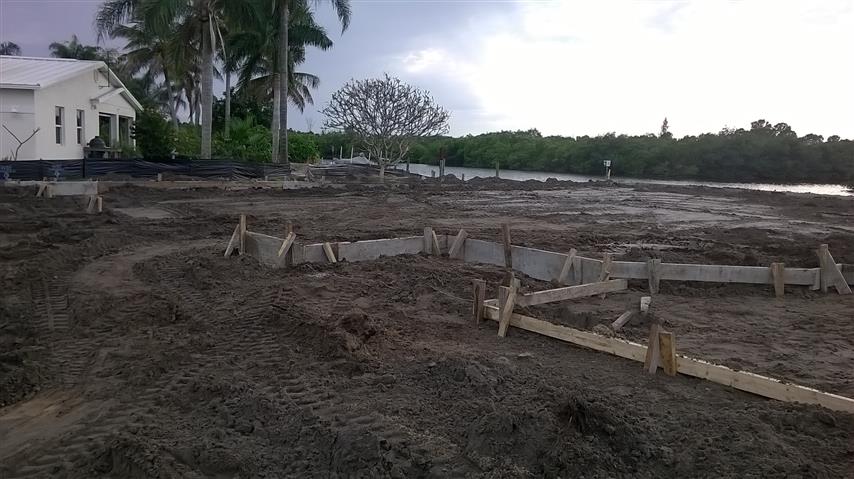
In the previous blog I wrote about the difficult task of digging a trench behind the seawall.  Once the trench was done, building the forms came next.  Rather than get into an in depth discussion about the forms I have decided to just show them to you.  They are kind of a work of art.

From the front side: (note: the pour was done in halves so you can see part of the first section of wall in the picture below)


 From the back side:


There were a few challenges with these forms.  One challenge was that on the canal side kickers could not be placed due to the water in the canal.  Another challenge was that the house side of the form was in 2.5 feet of water.  Another challenge was that there were multiple tie bars and weep holes pipes sticking through the forms causing difficulty in joining the forms together.  Finally the seawall was not level so that the height of the retaining wall changed from 1.5' to 1' relative to the seawall cap.  I kept the entire wall level using the canal water as my guide.

At first I did to know how to accomplish the form building task but after discussing it with dad who had some great ideas which saved me alot of headaches our ideas merged and I was able to pull it off.  Once they were built  it was time to place the rebar. 

Fiberglass rebar is the best rebar product that can be used where salt water intrusion might occur.  Since concrete is somewhat porous or because it may crack, water intrusion will cause steel rebar to rust and eventually fail.  There are a number of solutions to help prevent this from happening like galvanized rebar, epoxy coated rebar or they can even put an additive in the cement to inhibit corrosion.  All of this is extra money and there are issues with the solutions.

That's why fiberglass rebar is the best since it cannot rust and is stronger in tension then steel. The only thing better than fiberglass rebar is free fiberglass rebar which is what TUF-BAR in Canada gave me.  They said large orders are cost effective but because I had such a small order it was not so they gave me 25 pieces for free and just charged me shipping.  Shipping was surprisingly low for the weight involved and distance at about $100.  I always like to save some money on a project so I was very appreciative of the generous donation.  I later acquired 25 more pieces from TUF-BAR and was happy to pay the full price.

Below is a picture of the free rebar from TUF-BAR.


My rebar plan was to lay two lines of rebar down the wall one at 12" from the top and one at 24" from the top.  Once I had installed the rebar it was go time for the cement.

For the cement I chose 5000 psi double fiber cement.  As I have mentioned in previous blogs I like to use Advantage Concrete because they mix the cement on site and only charge for what I use.

It was about 4 o'clock when we started the pour on the first half.   The forms I had made to hold the cement were part wood and part seawall and were just under five feet in total wall depth.  The top part of the retaining wall was about 9" wide but below the seawall the width varied from 18" to 24".  This meant that the pour for the first 36' of the retaining wall would take 15 yards of cement which is 38000 pounds.  Yep once this cement was in there and set it was going anywhere.

As the pour started I was pretty nervous.  This was an experiment and I wasn't sure if the seawall would leak cement with all the seams it had and occasional hole.  After all I really could not see what was going on with the seawall under the water.  Way too murky.  Were there large gaps in the seams at the bottom?  If so a lot of concrete would flow through and end up in the canal.  My wood forms had some gaps in them as well.

As the pump guys began I instructed them to put cement in the wall in three passes.  I was hoping that the first pass would set up and alleviate some pressure as they pumped the additional layers in.

 As they started and made the first pass every thing looked good.  The seawall and forms were holding nicely.  It was fast pour though taking about only about 15 minutes which meant that there was not time for setting up.

I don't know what you think but I was thinking at the time that 38000 pounds was a lot and I was a little nervous about the forms being able to hold all that weight.  One thing I had in my favor was the water pressure from the canal would help equalize the force of the concrete on the other side of the seawall.  But concrete is heavier than water.

As the second pass of the poor was started, the pump guys got some concrete on the seawall cap which was right next to the dock I was standing on.  I got the trowel out and went to cleaning it up.  And then I saw something.  The seawall cap seemed to move right before my eyes a quarter of an inch away from the dock.  I looked again but the cap was stationary and I said to myself  "noway I must be imagining things."

I then decided to check the seawall by looking under the dock.  As I was laying down on the dock looking underneath it at the seawall I heard a quite crack.  I dismissed it as one of the pump guys hitting the hose against forms.  I then stood up on the dock and looked at the pump guys progress.  It was going good.

But then it happened.  A loud noise occurred that almost sounded like thunder from a short lightening burst and this time  even the pumps guys heard it over their noisy equipment and they immediately stopped there pump by flipping the kill switch.  I looked at the seawall cap and it had moved a whole 1.5" away from the dock.

After some excited chit chat with the pump guys, I was leaning toward calling the pour off. I told them to wait a half hour.  I then called my dad who was on stand by in Wyoming.  We talked about the consequences of stopping the pour and I was really not wanting a cold joint in my wall which would happen if the cement were allowed to set up and then the wall was finished off later.  The joint could possibly leak sand into the canal as it opened up in the future or the wall might buckle.  We both agreed that the original seawall was near complete failure and so I made the decision to call the pour off.

Because the wall was only half poured I had to adapt quickly before the cement set up.  I had not counted on a cold joint being in my wall.  I took my dads suggestion and cut several rebar in half and stuck them vertically into the pour.  This would help tie the two pours together.  Also my instinct told me to take a pointy 2x4 wood stake and make as many holes in the wet cement as possible.  This would help lock the two pours together.

Shown below is what I did:


Later on when the cement was done, I would read what is typically done when there is a cold joint in wall.  Usually, a sheer key is used which means that a channel is made in the wet cement of the first pour so that the second pour can fill into it and lock the lower and upper wall together when the cement is hardened.  My instinct had been right on the money and the stake idea as well as the vertical rebar had improved the walls chances of staying together in one piece.

At this point I was glad that I had chose a concrete company that mixes on site.  Because any excess concrete (which would have been about four yards) that I had ordered with the other companies would have been been thrown away and I would have been out $700.

The next day the cement for the first pour was hardened and therefore all the force on the seawall was diminished to zero.  The cement company came again and topped off the wall no problem.  Later on I did an underwater inspection with a go pro camera I borrowed from a friend at work and found that the seawall had indeed ruptured in one spot.  A sort of shelf was formed where a 1 to 2 foot lower portion of the seawall bent out and the concrete flowed out.  I don't have any good pictures as the water was so murky at the time.

The second half of the wall went without issue since I had I adopted the two pour method for it.   It required 11 yards of concrete and the forms held great.  I put even more vertical rebar in the second time and made many stake marks in the concrete for the sheer key.

After about 4 days I ripped off the forms.  Since there were so many places that the tie bars and weep hole pipes went through the forms and thus so many joints the forms were locked into place for good on the house side.  This was not an issue since it was a retaining wall I was building and the house side would be covered with dirt.  I cut the forms off about 1.5' below the top of the retaining wall.  The forms on the front side of the wall came off fine as I was very careful with the joints and the surface was very flat.

The end result for the wall is shown below.


 And here is another angle.


It was about the time that the forms came off that the water cleared up a lot in the canal.  In fact I could now see to the bottom of the canal.  I'm not sure what caused this.  Maybe it was the new rain or the death f the brown algae.  Its a mystery to me.  One things for sure.  There is still a lot of work to be done before the lagoon is healthy.

The wall is great in my opinion.  It could be made to look prettier by adding a stone veneer and stone cap or tile.  Maybe in the future I will do that or maybe not.

So the question is how much did I save by doing the project myself?

Dare we compare the retaining wall cost to the cost of a new seawall?  The retaining wall actually solves some problems that a new seawall would have.  One is the land height issue in that there was too much slope near the seawall.   Secondly, the sand leak issue which forms the trench behind the seawall is solved.  Thirdly it takes the land pressure off the old seawall.  On the other hand it does not provide the barrier to the water on the canal side.  The 70 year old seawall does that.

One bonus to the retaining wall method is that I have a convenient step formed by the original seawall cap which enables better access to the water than the towering vinyl seawall implementations in the neighborhood

As was mentioned before the cost of a new seawall would have been $16800.
 
For the retaining wall which took me 155 hours to build I paid $6675 which is broken down in the categories below:


ties bars                     275

form wood                 840

Nails / Misc               150

labor                          487

concrete                     4540

fiberglass rebar          383


That's means s whopping $10125 or 60% was saved.  Cue the cash register sound.

Happy Building!

The Dr


Saturday, June 4, 2016

My wall is bigger than Trump's wall...Part 2

In the previous blog I discussed my decision to make a 1.5 foot retaining wall.  Once I made this decision I got to work digging.   In the beginning of digging the trench behind the seawall, I didn't know how much of the retaining wall I was going to do for the first pour.  Keep in mind at this stage it was all an experiment and I wasn't really sure it was going to work.  I pondered if I should do a test pour for 20' of wall.  Part of me wanted to see instant results to alleviate my doubts and besides digging was taking so long.  But every time the concrete pump guy comes out its $250.  So realized I wanted to minimize this expense.  Eventually I ended up doing two pours as a compromise.  One was for 36' of wall, the other was for 44' of wall.  

Digging was tough.  I wanted to dig as deep as the water depth on the canal side of the seawall.  But I found that I could only get to within a foot of that depth and then no further due to the sand filling it back in.  Did I mention I was digging in waist deep water?  The water was soothing and kept me cool during some very hot days but it was a muddy smelly mess and I couldn't help to think about all the bacteria and what not that was in the water.  In fact in the past I shined a light out over the water at night and it is amazing to see hundreds little sea creatures appear.  For that reason I decided to never swim in the river.  And yet here I was waist deep in water.  Not only that brown algae was present at the time in the lagoon making the visibility less than 6".

Here is a picture of the trench I was digging.  Notice the dead man tie bars that hold the seawall up.


As I was digging in the watery trench, I noticed a few flounder floating in the canal.  I had never seen flounder in the canal yet alone realized they even existed in the canal.  But it didn't dawn on me till later that there was a reason the flounder were floating on top of the water and not the bottom like they usually do.  They were having trouble breathing and were coming to surface for air.


A day later there was a massive fish kill in the Indian river lagoon.  What had happened was the brown algae had grown so prolifically in the lagoon that it had used up all the oxygen in the water and it killed the thousands of fish.  Check out this link and this link for more info on the fish kill.
 
The lagoon is filled with water that is not circulated or exchanged with fresh water very much.  There is a port to the north about 20 miles (port Canaveral) where ocean water comes in but that is under lock control.  The port to the south (Sebastian) where ocean water is free flowing but it is 40 miles away.  Because of this the canal water is not tidal and only goes up and down when it rains.

Being immersed in this brown algae water and with all these fish dying made me wonder if the brown algae was toxic to humans but after some internet browsing I came across some articles that said it wasn't

During this period I came home one day after work and it smelled like hydrogen sulfide gas or rotten eggs.  It was so bad that I drove away from the neighborhood and contemplated staying in a hotel.  But I came back and turned on the air freshener in the house and stuck it out.  In fact one of my neighbors called the fire department that day and reported a gas leak but when they came out they found no leaks and explained to him that it was the rotting fish that was causing the smell.

With the fish kill and the terrible state of the water,  I understood now why I was required to go through all this effort to build a swail.  The swail was to help protect the lagoon from pollutants such as oils, tars, fertilizers and other pollutants that would normally be carried by rain water run off into canal.  It would cause the runoff to be filtered by the sandy soil before entry into the water.  It is well known that the brown algae really likes the lawn fertilizers and that is what killed the fish and made the lagoon look so terrible.

Digging was going slow and I was really worried that the water level which was low would rise to above the dock as it had last year making my job even worse.   One of the reasons why it was so slow was the filter cloth which was buried in the soil.  This stuff was buried deep and hard to get out especially when there was tree roots involved.  I resorted to attaching  the end of the cloth to a 1500 lb harbor freight electric winch.  The winch worked somewhat but I had to do a lot of digging to assist it.  Because of these issues I decided to get day laborers to help me.

I had always wanted to see what it would be like to hire somebody to help me.  There is really only one legal way to get someone to help you on your house if your going to pay them.  They must have workers comp insurance.  A licensed contractor will have this insurance, however since I didn't want to pay $16800 to hire him and since I don't own a construction business that has insurance for employees, I hired day laborers with insurance through the company they worked for.

The rate for a trench digger is $17 an hour part of which is to pay for that insurance.  Every day I wanted a trench digger I got someone different and I ended up with five different people helping me out.  I think the one important thing I discovered was I could dig the trench twice as fast as they could.  However, with the day laborers I did end up with another point of view on what I was doing.  Every time some one came out they would say something like why are you not using a back hoe.  It was a funny comment.  Using a back hoe would put them out of their trench digging job.  Nobody really wants to dig trenches!  haha.  I would explain that the property was sloped and I was afraid the back hoe would end up in the water.  Also I thought I could get the trench dug by hand for cheaper than the back hoe rental.

One laborer with another perspective recommended I use a bigger winch or come along to get the filter cloth out.  This hadn't occurred to me actually since I had relied on the harbor freight winch for all my construction work.  It was a golden nugget of an idea.   And luckily the winch broke as it usually does so I returned it and I picked up a come along for 30 dollars at harbor freight.

The come along was amazing.  For 30 dollars I could apply 8000 lbs of force to the filter cloth all without electricity.  The filter cloth came out much easier with it.  In fact I was able to get all the filter cloth out except where it was pinned down with concrete.  Remember in the earlier blog I mentioned unloading bags of cement in holes to plug them?  The filter cloth not coming out in two spots was the result of that.  With the 8000 lbs of force applied to the filter cloth pinned down by concrete the filter cloth started to rip.  In the end I just cut the filter cloth off at the bottom of the trench and moved my digging operation down the line.

Here is picture of the come along in action.


 This a good picture of the filter cloth being pulled by the come along.


There were a couple of other things I found when digging the trench.  In one case I had found some old seawall sheet material.  Apparently in the past the seawall had been repaired and the old sheet material had just been left there.  This repair was not successful as the seawall in that spot had a five foot long horizontal break in it.  I didn't try to hard to get the sheet out, I just figured I couldn't.  The decision was made to leave it be and cover it with cement when the time came. 

The other thing I found was my tape measure.  I was very happy to have found it. Yep.  I had lost it in the watery trench about 6 months ago.  It actually worked for about a day.  Then it froze up.  But that's not the end of the story.  It was a Kobalt tape measure which means it has a lifetime warranty so I got a new one at Lowes no charge.  Based on my experience with tape measures and how they always break, I highly recommend either a Kobalt or Husky (Home Depot) tape measure due to their lifetime warranties. 

In addition to the trench I also dug the new dead men and tie bar holes.  A dead man is required to be a concrete pad 3' by 2' by 1' buried 2' deep.  The tie bars are 5/8" galvanized rebar about 10' to 12' long with a hook at one end that is buried in the pad and a plate at the other end which is placed in the wall.  There is supposed to be a dead man every 10' along the wall.  However, all these code requirements are for building a seawall.  I was actually building a retaining wall for landscaping purposes and not altering the existing seawall.  But just in case I put them in.  Since the old dead men were still good and went through the new wall, I ended up with 18 dead men along the 80' of wall.  That wall is going nowhere.

Below is picture of a new dead man tie bar hole set up.  The galvanized rod is in the picture but I had not bent it yet so that there is no hook visible.  Also in the picture are some white sprinkler pipes.


I used the trench diggers for the first 36 feet.  They cost me $487 dollars.  Together without a good winch we spent 52 hours of trench digging.  For the second half I dug 44' of trench myself with the aid of the come along and it took me 24 hours.  For the second half the learning curve for the job was over at this point I had become a hell of a digging machine.  It showed in my callousey hands and bigger muscles.

After the trench was done on the first half, I took to building the forms.  Luckily dad was able to help me 2000 miles away.

To be continued

Happy Building!

The Dr


Tuesday, May 31, 2016

My wall is bigger than Trump's wall...Part 1

After about 1.5 years of renovating the house (I added a cedar covered porch in the back, expanded a single car garage to a two car garage in the front and worked on  the boat house) while holding a full time job I found myself at the point where I needed to work on landscaping.  Since I live by a canal which connects to the sensitive banana river I am required by the department of natural resources to build a swail.

A swail is a shallow depression and in my case it is about 5 feet wide 60 feet long and 3" deep.  Because of the additional square footage, there is the concern that the runoff from the roof will go into the river.  The swail helps capture the runoff before it goes into the river so that the water is filtered by the sand before it enters the canal.

However, there is  steep slope in the yard due to the fact that the house is about 5 feet above the water level in the canal and the house only sits 20 feet away from the water.   Because of this the swail becomes ridiculously deep on the house side in order for it to have a level base. 

Another problem that I as well as many other homeowners around the area have is that the seawall is made of corrugated sheet material that allows dirt to pass through its seams.  Over time this results in a watery trench behind the wall.  Its a tripping hazard and the steep slope near the seawall doesn't help.

Many home owners in the neighborhood have put in new vinyl seawalls that are as much as three feet higher than the old seawall.   The u shaped vinyl pieces are placed in the water and sunk down into the sand with a jet pump.  The vinyl is then capped off at the top and the wall is anchored to the land by using tie bars attached to cement pads located 12' from the seawall buried in the sand.  The cement pad and tie bar combination is known as a dead man.  Then fill dirt is placed behind the new wall and the old wall is covered up.  The end result is very nice and seems very durable.  The only problem is the water becomes somewhat inaccessible due to the seawalls new height.  But the homeowners are prepared for global warming!  The price of such an installation is $210 per linear foot or about $16,800 for the 80' of seawall I have.  I think those professionals should work a step into the design to allow easier access to the water.

Below is an example of some typical seawalls used to replace the 70 year old corrugated asbestos seawall that was originally put in the neighborhood.  The one on the left uses pressure treated wood and the other uses vinyl sheets.  Note the height of the vinyl seawall.


My seawall seemed fine even though it was 70 years old.  There was a 5 foot long horizontal crack in one section of the seawall and the seawall was tilting out at the bottom about 6 inches but even so it was good for another 50 years.  However it did leak sand.  One method that is commonly used around here to fix the leak is to use filter cloth.  This black plastic holey cloth lets water pass but not sand.  The idea is to dig a trench behind the seawall and run a 6 foot wide filter cloth sheet all the way along the 80' of seawall and then back fill with sand  Theoretically the idea should work.  However, for one reason or another the filter cloth over time slips down into the ground and you end up with the same leaky sand problem.  For my seawall this was done about 15 years ago.

When sand leaks out in one spot around the seawall a common method for a quick fix is to throw bags of dry cement in the hole.   This theoretically should work and the cement should harden an plug the leak.   I personally unloaded several bags of cement in the holes that appeared along the seawall as I was living in the house over the years but it always seemed that it did not really fix the problem or if it did it was temporary.

There are many other ways to fix the leaky sand problem on seawalls.  However I had a land height problem as well.  I considered putting in a new vinyl seawall myself, but I had two issues.  I would have to remove and redo the dock and there was coquina rock next to the seawall making it hard to sink the vinyl sheets.  Because of this and the pricey cost of using a contractor to do it, I decided to build a 1.5' cement retaining wall behind the seawall with a deep footer all by myself.   I don't think anyone in the area has approached the problem this way.  So it ended up being new territory to explore and new methods to develop.  Little did I know I was in for some really shitty work.

To be continued in the next blog

Happy Building!

The Dr


Tuesday, March 1, 2016

Green Builder makes Green Concrete Part 2

As mentioned in part 1, I was already a year into the project which involved planning and navigating the many requirements of the building department.  I had two permits in hand now and I chose to focus on the concrete slabs for the garage and cedar covered porch.

Because I had never held a construction job and have limited construction experience I am considered green when it comes to building.  Stories abound of homeowners with little experience attempting construction jobs and screwing up big time such as the guy who made a slab which required 10" footers for a 4" thick slab.  Thinking he needed the 4" on top of the footer for the slab and neglecting to put in subbase and base material in he ended up with a 14" thick slab.  The cement truck driver of course was happy with the extra money and laughing about it all the way to the bank.  Furthermore the owner forgot to put the plumbing pipes in the slab, so the slab had to be cut up with a concrete saw.  Often these stories have the key element that it would have been cheaper and faster had the contractor done it.

Continuing on where we left off in part 1 with my screw up, I took the sawzall and cut the screws holding the 2x2 stakes off the forms without damaging the forms and put in the proper kickers.  The kickers were now strong enough to handle the weight of the concrete and rigid enough to prevent the form from moving and instead of screws I used double headed nails.

Part of the process for putting the kickers in was making the forms vertical or as close to 90 degrees as possible and making sure the forms provide the proper grade and the dimensions for the slab.  This was actually quite challenging for me due to the length of the forms.  The straight level I was using was not very good and inadequate.  In fact I believe that professionals use a transit which is an expensive $800 dollar piece of equipment that can be used to make forms level.

We did not use a transit.  We resorted to ancient technology known to humans before Christ was born that in fact is more accurate then a transit and cost about $40.   It was my dads ingenious idea.  More about this amazing tool later in part 3 of this blog.

With it we got the cement pad  forms level over a 30' span to within an 1/8".  In my case I chose very little grade for my pad because it one day may become an enclosed addition for the house.   Totally not worried about water shedding off.  The resulting forms for the cedar covered porch are shown below:


The kicker we found was somewhat adjustable but a little difficult to change when we used it and these were the type of kickers my dad had used as a carpenter on the job.  We ended up trying another form of kicker for the garage pad shown below:


The kicker was a lot more adjuster friendly.  As you may have noticed the forms for the garage have an allowance for 8" by 4" curb for the cinder block wall to rest on.  The cedar covered porch does not have walls so there was no need for the curb.  It was during this state in the construction of the forms that my neighbor a retired architect in his 80s had come over and examined my work.  He said, "Those are some of the best looking forms I have ever seen."

In response I replied, "Well did you know they also play music?"  Read what happens in the next blog.


Happy Building

The Dr


Sunday, February 28, 2016

Green Builder makes Green Concrete Part 1

After about a year of planning and then navigating the Florida building department requirements, I was finally ready to break ground with permission from the building department with my two new permits.  One permit covered the expansion of a single car garage into a two car garage and the building of a cedar covered porch which required the construction of two concrete slabs.  

I am green builder.  I have never held a construction job and have little experience in construction.  When I started the actual physical construction part of the project, I thought it would only take 3 months to do everything.  Its been 1 year and 3 months now and I have 6 months to go.

I also thought I could do this project.  But in hindsight I see that I couldn't and was oblivious to this fact.  Luckily I come from a long line of successful builders.  Dad who lives out in the mid-west 2000 miles away is a structural engineer and a carpenter and had helped build many houses in Florida.  My grandfather and great grandfather built many houses in Pennsylvania as well and owned a lumber yard.  In short building is in my genes. 
 
The cedar porch needed a 350 sq ft concrete slab and the garage needed a  245 sq ft pad added on to the existing slab.  I decided to first attack the existing patio where the cedar covered porch would go.  To do this I made use of a brand new $240 electric jack hammer I had picked up from harbor freight.

It didn't take long for me to learn it was only necessary to apply the jack hammer in key locations to get concrete to crack which made the demolition process faster.  However I also learned that there was rebar and wire mesh in the concrete that made it difficult in separating the chunks.  The demolition for the 26 x 10 patio took 16 hours.  And yes there are easier ways of demolishing concrete.  Luckily it was December and not broiling hot outside.


The next step was to put the batter boards up and use string to mark the extents of the pad.  By using the building plans as a reference the string perimeter was adjusted to match.  Precise 90 degree angles in the string perimeter were made using the 3-4-5 triangle technique.  Except in my case the slab was in the form of a rectangle with two corners cut off so that extra strings were setup to match this feature.


Next I transferred the results from the batter boards to stakes and string to outline the perimeter and then used a can of spray paint to mark the perimeter.  This allowed me to accurately excavate the trench for the footers and the forms with a shovel.


Now it was time to build the forms.  I had been experimenting with wood working for couple of years and had made two nice pieces of furniture.  A walnut and red oak entertainment center and a cedar BBQ bench.  In fact the cedar BBQ bench was so nice and pretty it made me feel that it needed a structure to protect it when it was outside.  Hence the cedar covered porch.

As an electrical engineer I know this as scope creep....which is a dirty word in to project management and results in schedule slips, cost over runs and the customer getting something he didn't ask for.  In my case there were several heated conversations between the customer (me) and the manger (myself)  and the employee (I) because of this.  But everything is ok now because the schedule was thrown out the window, the customer is getting product that is better than he initially imagined and the cost is expected to be half of what a contractor would charge.

The point I'm trying to make though is that fine precision wood working skills which is what I possessed isn't needed in the building of throwaway concrete forms.  Shown below are the resulting forms of professionals that do this kind of work for a living.


I went ahead and built forms out of 5/8" plywood and 2x4 lumber.  I did not use the technique above where the dirt trench is used as part of the form to shape both sides of the footer.  Instead I made 16" forms to make the one side of the 16" deep footers and the dirt trench formed the other side.  With the forms made, I installed them around the perimeter and leveled them with a straight level.

During the time that I spent working on the project, dad had packed his tools up in his truck and made the trip to Florida.  I didn't know it then but his arrival at the job site made this project possible. 

When he arrived he took a look at the forms I had made and said "what are you building? a piano?"  We laughed.  The expression he's building a piano is used to convey that unnecessary work is being done to accomplish the task at hand. That and it didn't help that the slab kind of looked piano shaped.

The forms were made with tight tolerances and were precise in all dimensions.  They were square, level and true.  Only problem is I wasn't really sure how to brace them.  To brace them I had used 2x2 stakes and screwed them to the forms.  The flimsy stakes and screw idea was a screw up.  I thought screws were superior to nails because I had read in books that pounding nails into forms would make them out of true.  Screws don't disturb the forms at all.  What I hadn't foreseen  was that I would have to take the forms apart and put in proper kickers that my dad recommended.  But dirt had gotten in the heads of the screws and they were not coming out!   This meant it was time to break out the harbor freight sawzall and start cutting!  Read what happens in the next blog


Happy Building

The Dr