Showing posts with label Foundation. Show all posts

Tuesday, March 8, 2016

Green Builder makes Green Concrete Part 4

In part 3, we discussed the base material I used for the concrete slabs.  Now its time to focus on concrete reinforcement steel or rebar.

Where exactly does rebar come from?  It comes from a truck.  That's a common construction joke but actually there is more truth to that than I first realized.  Rebar comes almost entirely from recycled old cars, appliances, and other scrap steel.

Why is it used in concrete?  Concrete is very good in compression but not in tension, rebar helps compensate for this to carry loads tending to elongate the structure such as tensile loads and if the concrete cracks rebar holds it together.

And one final fact, Rebar is Chuck Norris’ preferred iron supplement.

From the plans, I was required to use the #5 or 5/8" rebar.  The rebar is placed in the footers and wired to metal chairs.  Having never done rebar before I decided to try my tubing bender which I had purchased for bending electrical conduit.  It worked great.  Since rebar comes in 10 foot lengths it is necessary to overlap the rebar and then tie them together with wire.  Code requires a minimum overlap length of two pieces of rebar.


In addition the plans called for 1 foot rebar dowels spaced 4 feet apart that tie the new foundation to the old.  This allows them to expand and contract together.  To install the dowels I used a hammer drill from harbor freight with a 5/8" cement bit to drill a 6" hole in the existing foundation.  Then I used my heavy duty caulking gun and put some QUIKRETE anchoring epoxy in the holes.  The dowels were placed in the holes and the epoxy was allowed to set.


In addition to the footers and dowels, vertical rebar was installed so that the foundation could be tied to the wall.  The vertical rebar is placed in the cinder block cells that will be filled with cement. Not every cinder block cell is filled with cement, just the corners, ends and other exceptions.  When the block is in place on the foundation to make a wall, the top two rows are filled with cement and rebar as well to form a bond beam.  This provides a very strong structure that is all tied together through cement and rebar that will hold up to hurricane force winds.


However reinforced concrete will meet its match when category 5 hurricane is involved.  Living in Florida I have evacuated for a couple of hurricane strikes.  A few category twos have come though here but the house is still standing.  In Homestead Florida hurricane Andrew, a category 5,  hit leveling every thing in sight. Interestingly enough one of my colleagues at work actually claims to have played football with his family when the eye of the hurricane passed over his house.  I don't know how they survived but his story of what they endured is pretty scary.   See this link Block Home Hit by Andrew for a picture of a cinder block home that was hit by hurricane Andrew. 

Having completed the rebar it was now time for the inspection.  This was my first inspection ever and I was looking forward to talking about construction with the inspector and getting the inspector's approval.

When the inspector came,  I was in the house.  I opened the door and I saw him looking at the forms and rebar with a very irritated and almost pissed off look.    I greeted him in a cheery voice and said, "hello how are you?"  He ignored the question and said, "I'm canceling the pour when is it scheduled?"  I said in a respectful tone of voice, "It will be scheduled when you pass the work."   Then he said, "where are the site plans?"  Since I didn't know to bring them with me, I scrambled back into the house and rummaged frantically through the mounds of paper work and old plans to find them.

After he looked at the plans he said, "your missing a rebar dowel, you neglected to tie the footer rebar into the house foundation and you need to put rebar around the sewer pipe."  His face seemed to betray his thoughts of his lack of confidence in my abilities.  He then said, "who made these forms?"  I replied, " I did."  He seemed to be skeptical since the form job was much better than the rebar job.  Then he said, "I know your not going to do all this yourself who's helping you?"  I answered, "my dad".  I'm not certain why he was after who was helping me.  But my answer was satisfactory.

The inspector decided to reschedule the inspection instead of failing it and parted.  I guess that's equivalent to getting off with a warning from a police officer.  Glad I kept my cool.

A few notable cases involving celebrities and building regulation and the permitting process are worth mentioning.  I'm referring to Clint Eastwood and Chuck Norris's cases.  Both are legendary tough men in iconic movies and in real life.  The tripping point for Clint Eastwood and his decision to run for mayor of Carmel was the town council's rejection of his plans to build a small building to improve the city of Carmel.  He of course won the election and made it easier to build and renovate buildings.  See this link Clint Eastwood's Fight for more on Clint's saga.

As for Chuck Norris it has been reported that he gave the building department a permit to do construction on his house.

I later fixed the problems and then passed the inspection.  Honestly, I am glad I had that inspector because he caught another pretty big mistake later on when inspecting the framing.  In any case the good news was it was time to call the cement truck driver to deliver the cement for the pour.  I had no idea how fast the cement sets up in Florida but I was soon to find out.  Read what happens in the next blog.

Happy Building

The Dr


Saturday, March 5, 2016

Green Builder makes Green Concrete Part 3

In part 2 the making of the forms for the two concrete slabs was discussed.  The forms accurately outlined the perimeters of the garage slab expansion and the cedar covered porch.  So what was this amazing tool that I used to level the forms that cost about $40 but was more accurate then an $800 transit?  It is known as a water level.  The one I used was a 40' long 1" diameter clear flexible tube filled with water.  For a water level, the wider the tube and the less air bubbles in the tube the more accurate it is.  An example how the water level works is at this link.Water Level Video

Now that the forms were level it was time to select the base.  Unfortunately, I'm not talking about something as exciting as the bass guitar player in a rock band.   Although it does have something to do with rock.  haha.  But since we're on the subject of bass players, the question comes to mind who was best bass player of all time?  Any opinions?  Ranker says its Geddy Lee which can be seen at this link Ranker Top Bass players.  This video of Geddy Lee is pretty cool.

OK back to base material used for concrete.  I did a number of google searches and read about crushed concrete and limestone and found that they provided good  drainage and good strength and were used a lot up north in colder climates where freezing of the water in the subgrade is a problem.  If the subgrade is clay then this is problematic due to expansion when it becomes wet and contraction when it becomes dry resulting in the concrete cracking.  In my case the subgrade was sand which has terrific drainage and I'm in Florida where freezing is not an issue.  In fact it didn't get below 32 this winter.  Usually it will get below 32 once a winter in central Florida and then everyone that grows oranges down here is in a state of panic.  Believe it or not the orange growers spray their crops with water on freezing nights to save their crops.

For the base I was leaning towards lime stone when I called the fill dirt dump truck driver.  He said in Florida they just use sand as a base and stone was unnecessary.  But after talking with him for awhile I found in the past they used to use marl shell mix more often which is made of clay and shell fragments and is commonly use as a road base meeting DOT standards.  Clay? Now I was thoroughly confused but the driver convinced me that marl shell mix was good stuff and that's what I used for the cedar covered porch.  For the garage I used sand.

With the base placed we rented a vibratory compactor from home depot.  Dad had always used a jumping jack compactor and we tried to rent that but it was not working and could not rent it.  The marl shell mix compacted well,  held its form and seemed strong.  The sand did ok and wetting it down a little (the compactor had a water tank) helped but it seemed to be less stable and softer then the marl shell mix

Below is what the compacted marl shell mix looks like.


The next step was to install the rebar and then get the work inspected.  But as I would soon discover the road ahead was bumpy and filled with pot holes.  Read what happens in the next blog.


Happpy Building

The Dr

Tuesday, March 1, 2016

Green Builder makes Green Concrete Part 2

As mentioned in part 1, I was already a year into the project which involved planning and navigating the many requirements of the building department.  I had two permits in hand now and I chose to focus on the concrete slabs for the garage and cedar covered porch.

Because I had never held a construction job and have limited construction experience I am considered green when it comes to building.  Stories abound of homeowners with little experience attempting construction jobs and screwing up big time such as the guy who made a slab which required 10" footers for a 4" thick slab.  Thinking he needed the 4" on top of the footer for the slab and neglecting to put in subbase and base material in he ended up with a 14" thick slab.  The cement truck driver of course was happy with the extra money and laughing about it all the way to the bank.  Furthermore the owner forgot to put the plumbing pipes in the slab, so the slab had to be cut up with a concrete saw.  Often these stories have the key element that it would have been cheaper and faster had the contractor done it.

Continuing on where we left off in part 1 with my screw up, I took the sawzall and cut the screws holding the 2x2 stakes off the forms without damaging the forms and put in the proper kickers.  The kickers were now strong enough to handle the weight of the concrete and rigid enough to prevent the form from moving and instead of screws I used double headed nails.

Part of the process for putting the kickers in was making the forms vertical or as close to 90 degrees as possible and making sure the forms provide the proper grade and the dimensions for the slab.  This was actually quite challenging for me due to the length of the forms.  The straight level I was using was not very good and inadequate.  In fact I believe that professionals use a transit which is an expensive $800 dollar piece of equipment that can be used to make forms level.

We did not use a transit.  We resorted to ancient technology known to humans before Christ was born that in fact is more accurate then a transit and cost about $40.   It was my dads ingenious idea.  More about this amazing tool later in part 3 of this blog.

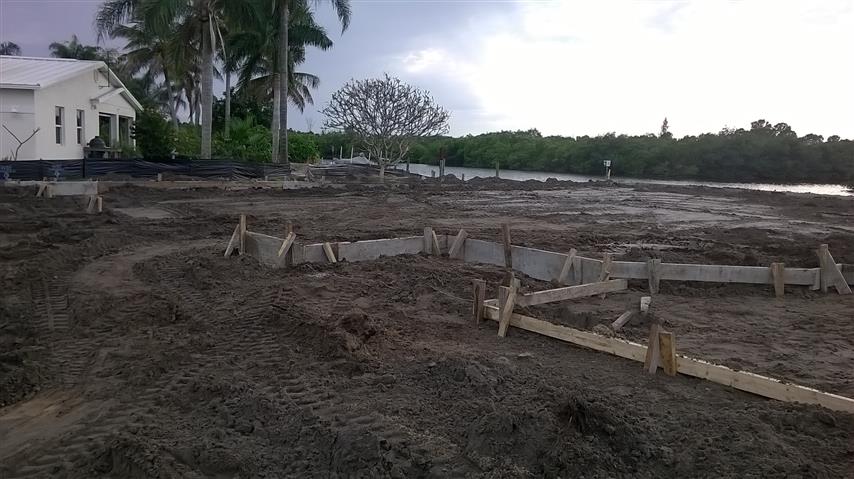
With it we got the cement pad  forms level over a 30' span to within an 1/8".  In my case I chose very little grade for my pad because it one day may become an enclosed addition for the house.   Totally not worried about water shedding off.  The resulting forms for the cedar covered porch are shown below:


The kicker we found was somewhat adjustable but a little difficult to change when we used it and these were the type of kickers my dad had used as a carpenter on the job.  We ended up trying another form of kicker for the garage pad shown below:


The kicker was a lot more adjuster friendly.  As you may have noticed the forms for the garage have an allowance for 8" by 4" curb for the cinder block wall to rest on.  The cedar covered porch does not have walls so there was no need for the curb.  It was during this state in the construction of the forms that my neighbor a retired architect in his 80s had come over and examined my work.  He said, "Those are some of the best looking forms I have ever seen."

In response I replied, "Well did you know they also play music?"  Read what happens in the next blog.


Happy Building

The Dr


Sunday, February 28, 2016

Green Builder makes Green Concrete Part 1

After about a year of planning and then navigating the Florida building department requirements, I was finally ready to break ground with permission from the building department with my two new permits.  One permit covered the expansion of a single car garage into a two car garage and the building of a cedar covered porch which required the construction of two concrete slabs.  

I am green builder.  I have never held a construction job and have little experience in construction.  When I started the actual physical construction part of the project, I thought it would only take 3 months to do everything.  Its been 1 year and 3 months now and I have 6 months to go.

I also thought I could do this project.  But in hindsight I see that I couldn't and was oblivious to this fact.  Luckily I come from a long line of successful builders.  Dad who lives out in the mid-west 2000 miles away is a structural engineer and a carpenter and had helped build many houses in Florida.  My grandfather and great grandfather built many houses in Pennsylvania as well and owned a lumber yard.  In short building is in my genes. 
 
The cedar porch needed a 350 sq ft concrete slab and the garage needed a  245 sq ft pad added on to the existing slab.  I decided to first attack the existing patio where the cedar covered porch would go.  To do this I made use of a brand new $240 electric jack hammer I had picked up from harbor freight.

It didn't take long for me to learn it was only necessary to apply the jack hammer in key locations to get concrete to crack which made the demolition process faster.  However I also learned that there was rebar and wire mesh in the concrete that made it difficult in separating the chunks.  The demolition for the 26 x 10 patio took 16 hours.  And yes there are easier ways of demolishing concrete.  Luckily it was December and not broiling hot outside.


The next step was to put the batter boards up and use string to mark the extents of the pad.  By using the building plans as a reference the string perimeter was adjusted to match.  Precise 90 degree angles in the string perimeter were made using the 3-4-5 triangle technique.  Except in my case the slab was in the form of a rectangle with two corners cut off so that extra strings were setup to match this feature.


Next I transferred the results from the batter boards to stakes and string to outline the perimeter and then used a can of spray paint to mark the perimeter.  This allowed me to accurately excavate the trench for the footers and the forms with a shovel.


Now it was time to build the forms.  I had been experimenting with wood working for couple of years and had made two nice pieces of furniture.  A walnut and red oak entertainment center and a cedar BBQ bench.  In fact the cedar BBQ bench was so nice and pretty it made me feel that it needed a structure to protect it when it was outside.  Hence the cedar covered porch.

As an electrical engineer I know this as scope creep....which is a dirty word in to project management and results in schedule slips, cost over runs and the customer getting something he didn't ask for.  In my case there were several heated conversations between the customer (me) and the manger (myself)  and the employee (I) because of this.  But everything is ok now because the schedule was thrown out the window, the customer is getting product that is better than he initially imagined and the cost is expected to be half of what a contractor would charge.

The point I'm trying to make though is that fine precision wood working skills which is what I possessed isn't needed in the building of throwaway concrete forms.  Shown below are the resulting forms of professionals that do this kind of work for a living.


I went ahead and built forms out of 5/8" plywood and 2x4 lumber.  I did not use the technique above where the dirt trench is used as part of the form to shape both sides of the footer.  Instead I made 16" forms to make the one side of the 16" deep footers and the dirt trench formed the other side.  With the forms made, I installed them around the perimeter and leveled them with a straight level.

During the time that I spent working on the project, dad had packed his tools up in his truck and made the trip to Florida.  I didn't know it then but his arrival at the job site made this project possible. 

When he arrived he took a look at the forms I had made and said "what are you building? a piano?"  We laughed.  The expression he's building a piano is used to convey that unnecessary work is being done to accomplish the task at hand. That and it didn't help that the slab kind of looked piano shaped.

The forms were made with tight tolerances and were precise in all dimensions.  They were square, level and true.  Only problem is I wasn't really sure how to brace them.  To brace them I had used 2x2 stakes and screwed them to the forms.  The flimsy stakes and screw idea was a screw up.  I thought screws were superior to nails because I had read in books that pounding nails into forms would make them out of true.  Screws don't disturb the forms at all.  What I hadn't foreseen  was that I would have to take the forms apart and put in proper kickers that my dad recommended.  But dirt had gotten in the heads of the screws and they were not coming out!   This meant it was time to break out the harbor freight sawzall and start cutting!  Read what happens in the next blog


Happy Building

The Dr